Friday, March 30, 2012

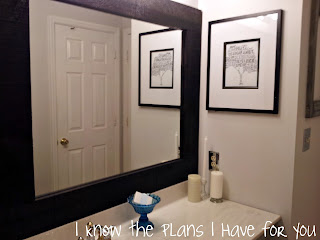
$20 Bathroom Makeover!


I know you have all heard of Design on a Dime, right?? Well, I don't know where they get there dimes from, but their dime is worth way more than my dime!! This is what I call, "I Ain't Got NO Dime Design!" Being the final week of the American Crafter contest, I wanted to do something really great, but I also needed to make something that wouldn't cost so much. In the previous weeks I spent no more than $10 on each project! I was able to repurpose things and it worked out, but I had nothing else I could redo that would, in my opinion, be contest worthy! I decided that my bathroom was in need of the makeover and I could do it for CHEAP!! I have to chuckle though, because that's not a typical project to take on when your budget is $0! Here is what I had to work with....


I know, it's super plain, but we rent our house and sometimes it's hard to bring yourself to put in the time and money for improvements. This was WORTH IT!! Here is how it turned out and then I'll go through how I manage to spend so little money!


I painted the walls with a mix of the gray from my bedroom and the white from the kitchen cabinets (painting the baseboard before I mixed the 2).....$0!
I have a great variety of paint, but nothing that I wanted for the vanity. Last weekend Ace Hardware was giving away a quart of their new paint for free! So that is what I used to paint the vanity and the shudder....$0!
I painted the grout with the same paint that I used on the floors, making a paint wash...$0!
At Habitat for Humanity, I found the wood that I used for the frame and the towel rack....$2
and used liquid nail to attach it to the mirror...$3
Already had the spigots...$0!
blue and orange spray paint from Habitat for Humanity...$6
stain from Habitat for Humanity...$3
white spray paint was on clarence at Sears Hardware....$1
I got the material for the shower curtain at Good Will....$4
The wreath form is from the dollar store....$1
already had the sheet music....$0!
already had frames....$0!

And that's the rundown!! A total of 20 buckaroo's!


Thanks for stopping by! Hope you like it as much as I do! I'd love to hear what you think!!

Remember to vote! You can vote HERE


Linking @:
Fireflies and Jellybeans: Show off you Stuff
Live Laugh Rowe: Live Laugh Linky
At The Picket Fence: Inspiration Friday
Cherished Handmade Treasures: Things We Find Pinteresting Thursday
Show and Tell Saturday
Six Sisters Stuff: Strut Your Stuff Saturday
Funky Junk Interiors: Sat Night Special
Miss Mustard Seed: Furniture Feature Friday
Addicted 2 Decorating: Addicts {not so}Anonymous
A Simply Klassic Home: Simply Klassic Sunday
Tatertots and Jello: Weekend Wrap Up
[Continue reading...]

Monday, March 26, 2012

Movin' On UP!!! American Crafter Finale Week....


I feel like I haven't been posting much, but I have to say that this contest is keeping me SO busy! I can't begin to tell you how thrilled I am to have made it to the FINALE {thanks to YOUR votes!}!! To think that on week one I had 30 votes, and this week, I had 164!!! Thank you all so much for supporting lil' ol' me!! This week is "contestant choice" week, and I can't wait to see my vision come to life!! I already feel like a winner! So, I leave you with that short post, 'cause I have A LOT to do!!! Anyone wanna babysit, LOL?? Since we all love pictures, here are all of my projects to date for American Crafter {at Nap Time Crafters}


Week 4: Contestant Choice


[Continue reading...]

Friday, March 23, 2012

Round 3!! Pallet Lemonade Stand...


Ok, round 3?! I can't believe I'm still here! I'm thrilled! There is SO much talent, I can't say that enough! Last week I made it through with my "Crib Craft Station", which has been my most viewed project since I've started blogging! This week the theme is "Spring", which I have to say, stumped me a bit. You try to out do your last project, but it took me some time to decide how. I don't think that I "out did" last week, but I am equally happy with it {and so are the kids!}. My husband suggested that I do a lemonade stand. It seemed like a great idea, but how was I going to make it special? I had been collecting pallets for a project I was planning on doing for my little one, but thought it would be great to do a lemonade stand with them instead!

I have to admit that I didn't take any pictures of the process. I was sick Tuesday and Wednesday, so I didn't get started till Wednesday Evening. I was really feeling the pressure, and I couldn't even think about taking pictures!
I'll explain what I did :-)

First let me say....IT IS NOT EASY TO TAKE PALLETS APART!!!! That was the worst part! The darker pallets were just breaking as I pulled them apart, so in a panic, I emailed a guy that I met (from getting something on CL) that had a ton on pallets. I told him what I was doing and asked if he could spare a few, and he said sure! He had some really nice ones (still didn't come apart easily) that I knew would be great. I started by taking the pallets apart, then I painted the slats using a white wash (white latex paint and water 1:1 ratio), which allowed the stain to go on smoothly (I used a walnut stain/varnish).  It would have been great to use a complete pallet and just fill in the spaces, but the kids lemonade stand would have looked more like a poolside bar! That would have been GREAT, but we don't have a pool ;-) So I cut it down to kids size. I screwed in the top, the sides that hold the sign, and the sign as well. I wanted to make sure that it was secure, so I didn't want to nail it. I also screwed in heavy boards behind the stand at the base, so it wouldn't topple over.
 The top is 4 slats held together by nailing it to 2 slat underneath with the front slat screwed on. I wanted it to look more "finished".


I made the puffs with coffee filters and a cupcake wrapper. I thought they turned out SO cute! I folded the filters in half and then in half again and hot glued them till it was a "complete" 1/2 circle. Then, just found the center and glued in the wrapper and the circle (which I printed on heavy card stock).


I used some printables that I found online, you can find them {here
and designed the picture for the pitcher and the straws on picnik. 
I will have to post all of the {other} printables that I made for this soon. While I was hard at work, "somehow" my  laptop screen broke. So stay tuned for those. The banner was made from drop cloth, scrapbook paper and hung with twine.


 I used yellow acrylic paint to hand paint the sign. Not, that it is hard to just paint "lemonade", but I think that we rely so much on some sort of  transfer method, that I was nervous that the spacing wouldn't be right. Thankfully it worked out. You only get one shot {when it's due 20 minutes!} I thought it was funny when my son said "Mom, you didn't paint the "e's" right! They're the wrong way!"

What's a lemonade stand without lemons??
 I got the basket from the dollar store, they have the best things!


 I don't know if I would categorize this project as "a fun one to do", but the outcome is definitely FUN!! With the right power tools this actually could be a fun project to do! I didn't have the proper tools and had to do it all with "powerless" tools. In total, this project cost me $6!! 
God only knows what I would come up with if I make it into the final week, but if you'd like to help me move on...vote here!! Happy Spring!!

sharing at these lovely parties:
Miss Mustard Seed: Furniture Feature Friday
The Shabby Creek Cottage: Transformation Thursday
Bringing Beauty: Beautify it Monday
Debbie Does Creations: Toot Your Horn Tuesday
Skip to my Lou: Made by You Monday
Chatty Chics: Wild Wednesday
Destination: Craft: Destination: Cutesy Monday
Center of Attention Deficit Disorder: Center of Attention Sunday
A Simply Klassic Home: Simply Classic Sunday
Junk in their Trunk: Link it Up Wednesday
Pincushion Creations: Homemade by You
Live Laugh Rowe: Live Laugh Linky
The Shabby Creek Cottage: Transformation Thursday
Tatertots and Jello: Weekend Wrap Up 
Funky Junk Interiors: Saturday Nite Special
Kitchen Fun with My 3 Sons: Crafty Friday
Days of Chalk and Chocolate: Latest and Greatest 
Fireflies and Jellybeans: Show off Your Stuff 
French Country Cottage: Feathered Nest Friday 
Little Becky Homecky: Fantabulous Friday 
Family Ever After....Once Upon a Weekend
How to Nest for Less: Just a Party with My Peeps 
Savvy Southern Style: Wow Us Wednesdays 
Craft Test Dummies: Kid's Craft Week Round Up 
52 Mantels: Thursdays Are YOUR Days 
Craftionary: Friday Fun 
Be Different Act Normal: Show and Tell Saturday  
Cherished Handmade Treasures: Things We find Pinteresting
[Continue reading...]

Total Pageviews