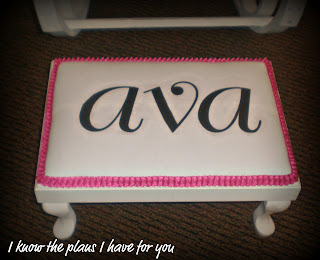
I know that my last post was quite long and a lot to take in, so I wanted to break it down a bit. I wanted to let you know what I did to redo the rocker.
BEFORE
I first painted it using ASCP Old White. I hand painted 2 coats of paint, which was no small task in itself. I would normally spray it, but I just wanted to cover the fabric, so I didn't want to get paint on it. After I sanded it, it was very distressed (which I LOVED) but I was afraid that it would be to much for my cousin. And of course I couldn't call and ask her! So I added some water to the paint to make it more of a wash and added one more coat. It went on super smooth and it didn't take much sanding for this coat. I don't have clear wax and I didn't want to put poly on it, so I left it unwaxed and no top coat. I did distress it and I know that even with natural distressing over time, it will still look great. I personally love the texture and the matte finish of the chalk paint without a top coat.
I originally was going to make the rocker all white because the room is already so pink.....just to remind you
 |
| You can see the process here and here |
I hand painted over the entire thing and as you can see where the words are a bit thicker, that's where the words were missing. The texture also wasn't smooth in those places so I couldn't make it perfect (which made me crazy). But by now I had put so much time into it, it was going to be imperfect with love :-). The stool was much easier because although I still had the same issues, it was much easier to paint just 3 letters that were bigger.
I used acrylic paint to paint the letters and using the gel medium, I put a thin coat over the name. It dries clear with a matte finish.
After I stapled the fabric on the seat, it just looked unfinished and impractical so I went with hot pink duck cloth. It looked so clean and new and I new I would be redoing the back. I didn't want to go through the whole song again so I just went with Ava again. Here is where I ran into some troubles. The gel dries clear on the white, but on the pink it wasn't 100% transparent. So to make it work, I used white acrylic paint and mixed it with the gel and painted the background. I wanted it to look like it was painted (like on canvas) so I made sure to add lots of texture. I did the same thing in black for the name. On the stool it is completely smooth, but I love the added texture on the back.
I think it really makes it feel much more "hand made". Then using a glue gun, attached the ribbon.
On the very back of the rocker there was a brown, cotton like fabric. I didn't want to remove it or cover it because I would have had to take it apart, so I dry brushed the Old White on in sort of a messy manner (on purpose) And hand painted some inspirational words.
I trimmed it all with a ruffled satin ribbon that I found at Joanns. It's about $3 a yard and I used about 7 yards, so do forget your coupon!
As for this transfer technique on this project....it is definitely a technique I would say NOT to use! It would be great to make a diy canvas! You can use any image as long as it's printed with a laser printer. Just remember, if there is text on the image, mirror image the words. You could do it on fabric or on a real canvas. It would be great for a family portrait and the print cost less then a dollar because you use regular paper!
The chair is so girly now and I am so happy with how it turned out! I would love to hear what you think!
If your new here I would love for you to stay and follow my journey!
I am entering this into the American Crafter Season 4 auditions! This is my first time entering this contest....so fingers crossed! The prizes are amazing!


This is adorable. A rocker is the best things for a child's room. Many a memory will be made there! Great job!
ReplyDeleteWow! I really like it! And the colors are so vibrant!
ReplyDeleteGreat job!
That is an amazing rocker! Love the color, the song lyrics, the back with the hand painted words! Fab job.
ReplyDeleteGlad you stopped by so I could find and follow (GFC & Linky)
Kelly
ahhh i love your stuff! glad I found your site!
ReplyDeleteThanks for stopping by and visiting me! I really love how you redid that rocker! It's so pretty in that room. You're very talented and creative to come up with that idea.
ReplyDeletethat Ava rocker is pretty amazing Jill! My grand-daughter's name is Ava, so I was especially enthralled with it. I hope you win the contest! Thanks for the kinds words on my blog post. I will be working on my chair redo today some more. I found some awesome fabric yesterday to combine with the burlap. Sure hope my vision turns out. Have a wonderful weekend. ~ Lynn @thevintagenest
ReplyDeleteGirl, that rocker rocks! :) Will you do me a favor and add my button so I can feature you this week? Great job!
ReplyDeleteMelody
Great job! The diamond wall looks great...although I'm bias because I did one very similar for my daughter! :)
ReplyDeletehttp://makingitfeellikehome.blogspot.com/2011/11/long-curtains.html
what a great redo on this piece, and it looks perfect in that room!
ReplyDelete