Monday, December 19, 2011

Winter Blues- Making a Slip Cover for a Storage Bin and a No-Sew Ruffled Tree Skirt

I don't know about you all, but I am having a hard time finding the motivation to get all of the projects done that I would like at this time of year! I can't say it's the weather so much, because here in Missouri, we haven't even had snow. It's definitely the time that the sun goes down. 
As a stay at home mom, I am used to doing a lot of the work on furniture at night. When I put the baby down for bed I'm used to still having sunlight for a couple of hours to go out and work! Although I hate working out in the cold, and the dark.....it has to be done!
I've been lazy about blogging my projects, but not lazy about reading everyone else's and I must say....I am inspired and loving everything going on in blog land!!
Here's a couple of things I've been working on...

Storage bin slip cover:

I've had this storage bin for years and although it serves a great purpose, it neither goes with the decor or is in great condition.

can you tell the kids like to get in here and "un-organize" this great
method of organization!

The twine has been unraveling for a year or two now 


So I decided to make a slip cover. 


I used painters drop cloth that I got from Walmart for about $10, the piping is made with rope I had in the garage and the sleeves of a sweater that didn't fit my husband anymore (I made a pillow with the front and back of the sweater) Good thing I shrink all the laundry, he doesn't think so :-)
and the flower is a crocheted flower I made over the summer for a hair clip for my daughter and just added an old pin I had laying around.
I painted on the "W" with a paint pen, and now we have a personalized foot rest, table, and still (hidden) storage!

And of course with Christmas right around the corner....I have 4 trees put up (but only pics of 1 for now)
I decided with a 1 year old that I would just put a small tree in the living room that she can't reach so well and the others on the lower level.


I just love the glitz and glam of all the glittered ornaments!

I also made this wonderful no sew ruffled tree skirt with Miss Mustard Seeds tutorial (that you can find here)
I was sort of glad that I was making it for a small tree as it was pretty time consuming....but worth all the time!  Definitely something everyone can do though! Thanks MMS for the awesome tutorial! 


I'll post pics of the great antique side table I've been working on as soon as it's finished!


Thanks for stopping by, and as always, I love to hear what you think!!

Linking up to:

Don't forget to head over to French Country Cottage for the great Annie Sloan Chalk Paint giveaway!!!

[Continue reading...]

Wednesday, November 23, 2011

An old stool + Graphics Fairy = SMILES

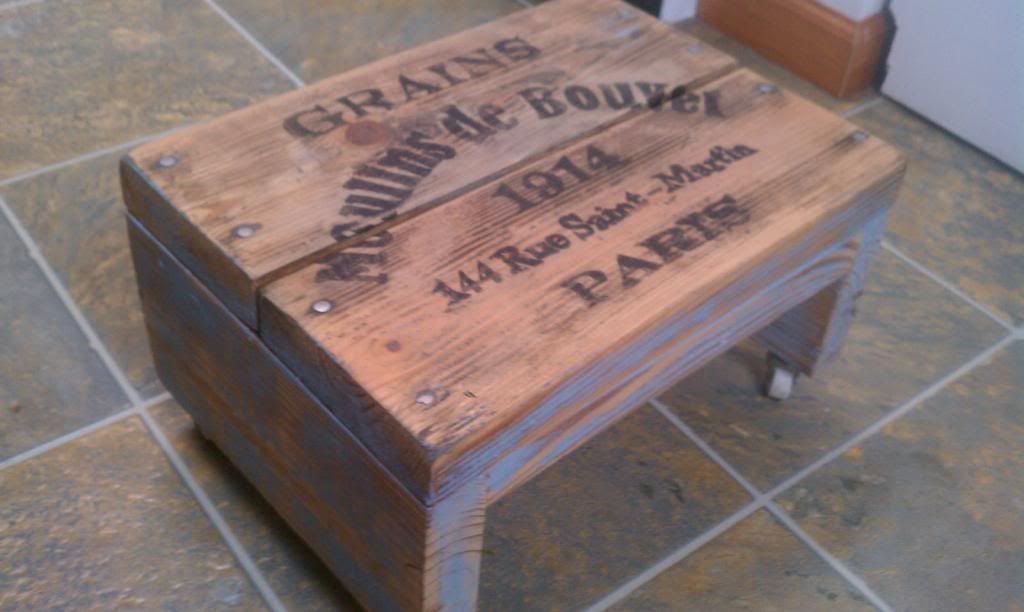
Last weekend when I was at my brothers house finishing the dining room set, a neighbor was having an estate sale. I must have driven past it 3 times before I couldn't resist. There wasn't much but I picked up an old TV cabinet ( I'll be getting around to that soon) and this old wood stool on caster wheel (of course I forgot to take a before pic, but it's not a hard one to imagine). I got them both for 5 bucks! Apparently I was the only one that found this little stool appealing (I showed up at the end of the day).
I headed over to the Graphic's Fairy blog and went through her amazing graphics till I came across this one


then I went to the website BlockPosters.com that she mentions on one of her posts. It is free and it will resize your graphic to any size easily. The technique that I used is from that tutorial as well. 
I decided not to use the wheat part of the picture since I had limited space, but I love how it turned out!


After I was finished painting on the graphic, I painted parts in blue and sanded and sanded some more to remove most of the blue. I wanted to make sure that it still looked old. 
I have a confession, which I am really only admitting to because my mistake can save you A LOT of time!! I didn't wait till the black paint was 100% dry and when I distressed it, the wood became a black mess, Duh!! It looked aweful! So I sanded it down and started over :-( A days work, wasted. So lesson, wait till paint is completely dry before distressing! The second time, I waited overnight. So after distressing again 
I used Minwax wipe on Poly to protect it. I LOVE, LOVE, LOVE how it turned out! I would love to hear what you think!


Linking up at:


[Continue reading...]

Tuesday, November 22, 2011

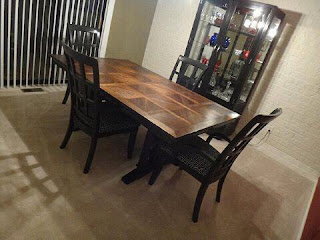
Dining Room Finished and SOLD!

Right before our move I decided to start refinishing my dining room (post here), but wasn't able to finish it before the move and it went into storage. Well in the mist of our move, my brother and sister-in-law were redoing their kitchen and dining room. My sister-in-law had seen the pictures on my blog and decided that it would be perfect for their newly remodeled home. So it got a "sold" sign on it and I had a lot of work to still do. So, Saturday it was delivered to there place and off to work I went. Before we moved I had finished painting the table and the hutch, and 4 out of 6 chairs. I still had to sand EVERYTHING, except the table top, and put a top coat on. After sanding everything smooth I distressed the black so the the brown would show through to compliment the top and on the part that came out too light, in a pinch I used brown shoe polish (which worked great and then hand waxed all of the pieces with Minwax finishing paste wax. The squares in the chairs and base of the table were a killer, but in the end it was SO worth it!! The sheen is beautiful. I feel lucky that family members chose it so I can still see it :-)

reminder
 before:


AFTER


I have a confession...I still only have 4 out of the 6 chairs done, but they will be done soon
I would love to hear what you think!
Thanks for stopping by!!

Linking up at:


[Continue reading...]

Friday, November 18, 2011

FINALLY BACK TO WORK!!!! AN ANTIQUE PEDESTAL TABLE MAKEOVER

I know that it has been over a month since I have posted anything, but for those of you who follow me, you know that we were moving. Well I won't bore you with the details (at least not in this post) but it couldn't have gone (and this is putting it mildly) WORSE!! So from the time that we moved from our last house to the house we are in, I had to put all of my treasures in storage, UGH!!! I couldn't do any work.....and it drove me CRAZY!!
Well, we moved into our house a couple of weeks ago, and before I could start on any fun work, I painted our bedroom, and gave the kitchen cabinets a makeover (I'll post on that soon...along with the ups and downs of that project). Yesterday I felt alive again, doing what I love....redoing furniture!!
I found this amazing pedestal table a few months back for $30. We were still in the process of packing but I couldn't pass it up. It had a terrible paint job, white paint slapped on and maybe a little glaze....but not good.
I know it doesn't look bad, but up close it was rough

LOVE THE CLAW FEET!

I didn't manage to take any pictures of the process, but I'll explain what I did step by step and bore you with some after pics ;-)
The first thing I did was stripped the top of the table using Klean-strip Stripper. It works great! You brush it on, wait about 20 minutes or so and it sort of bubbles up. Then you scrape it off. It's kind of messy, but much easier than sanding off the old finish. It took me a couple of times using the stripper to get of the paint and the old finish, but once that was done I sanded it smooth with my circular sander.
I stained the top with 2 coats of Minwax Dark Walnut (which is my fav!) sanding in between coat with steel wool. I used Minwax wipe on Poly for the top coat. I did 2 coats also sanding with steel wool.
Then for the base of the table, I couldn't wait to try the DIY chalk paint that I read about on Sherry's blog from No Minimalist Here (post seen here). I used a sample pot of Behr Ultra Spartan Stone in flat, and like Sherry's instructions, used 2/3 paint and mixed in 1/3 Plaster of Paris. The consistency was thick so I just added a little water. Shook it up and was ready to paint! It went on kinda gritty, but went on very evenly and the were no brush marks ;-). Oh, before I painted, I gave the table a good cleaning and the paint I used has primer mixed in, so I think it will hold up well. I used 2 coats of paint sanding between coats and it sanded SO smooth! The Plaster of Paris did change the color a bit once I sanded it, but luckily I liked it either way. I read that for some people it lightened the color, but in my case it darkened the color a little.
I didn't distress much, but just as read in some of her comments that said the paint can come off chippy.....it can, so be careful when sanding.
I waxed the entire table with Minwax finishing paste wax, and love the sheen and the feel of it! I'm not really sure if you are supposed to wax over wipe on poly but I did anyway, and it turned out great. I know know for sure that you don't have to.
I haven't use ASCP, and I am sure that the DIY chalk paint doesn't compare, but I have to say....I LOVE how the DIY chalk paint turned out compared to plain paint. I seems much smoother and was so easy to work with. I would say that if you are going to finish pieces that are waxed or have a polyurethane finish you should continue to take the necessary prep steps to ensure a long lasting finish.
I still can't wait to try ASCP....but a BIG thanks to Sherry @ No Minimalist Here for coming up with a secondary chalk paint technique!!

So after WEEKS of not blogging or taking pictures I went a bit crazy with the after pictures. I hope you enjoy!

One of my favorite things on the table is the picture of my Grandmother when she was young. It's a beautiful picture, and I miss her


linking up with these awesome Friday parties:


[Continue reading...]

Total Pageviews