Showing posts with label hand painted typography. Show all posts

Friday, February 14, 2014

Weddings, Love, and Gifts! Valentine's Day Collection with Red and White Chevron Labels {with Love from Me to You!}

Happy Valentine's Day! I hope you all have a special day planned, whether getting pampered, a glass of wine, a romantic dinner with the love of your life, or with the little loves of your life ;)


Here are some fun Valentine's day projects that you can do, along with some fun free printables! Just right click, save to your computer, and print! Easy peasy....

These are printables that I designed last year, but Cupid is still loving, so I thought that I would post them again! Here is the original post. Looking for more free printables? Got them here & here!

 photo chevronvalentinesdayandmustachetags_zps1d8fa7e6.png


This is a bench that I hand painted with "LOVE" written in lots of different languages. It still remains one of my favorite projects. For the original post, tutorial, and a link where you can find a printable if you'd like to use it on a project for yourself click here.


And this ruffled pillow, with my wedding vows, would make a perfect gift for your significant other! I used a Sharpie to write the vows....so it's washable! You can find this post here.


What is your favorite Valentine's Day DIY project?? Maybe you'll make one of these your own. If you like what you see, I'd love for you to PIN it! Keep your eye out for Cupid today


[Continue reading...]

Wednesday, February 20, 2013

Labor of LOVE {bench redo}

I know I say this A LOT....but I can't believe how long it's been since I've posted! I have been doing SO many amazing projects (at least I think so) and I am so excited to share them with you guys! Over the next few days, I'll show you the different projects. This one has a bit of picture overload, but don't miss the free printable at the end of the post :)

I am going to start with this one, because it was intended for Valentine's Day, but I can't pass up sharing it just because cupid has left the building! When I was thinking of something special that I wanted to make for Valentine's day, I didn't want it to be only specific to the "Love Day". Who wants to put in hours of work, to have to shove the decor into a box till next year?? Not this gal!

I decided that I was going to make a wood subway sign for the wall, that says "I LOVE YOU", in lots of different languages. I first designed it, which you can feel free to download the free PDF file.


I sized it to the wood I was using, so you can just resize it to fit your project. I printed it out (in 3 pages) and taped the paged together. Then I spent way too long (I won't even get into it) transferring it to the wood. Here it is in pencil...

I'm not sure where I went wrong after this, but let's just say that this was my first truly failed project. I think I ran out of patience with this one once I started painting the words. So a few days went by, and I decided to paint this bench.

I didn't have any intentions on painting the sign on it, but my sister-in-law suggested it. At first I thought....she's crazy! I'm not wasting all that time again!! But I'm a glutton for punishment.
[Continue reading...]

Wednesday, January 11, 2012

My new friend Blue and how I used newspaper to transfer an image...

Meet my new friend Blue, Louis Blue


I got this desk for free (love that price!) a few months back and it's been collecting dust in the garage since then. I decided that it's time for it's makeover!

So using Louis Blue, I got to work:

I actually didn't know my son decided to take a picture! I never have
pictures of me at work haha!

I wasn't sure what I wanted to do with the drawers as far as what color to paint them. I love 2-toned pieces, but I thought I should sleep on it. So it sat like this for the day.


I don't think that it's the wood that bothers me, because I really love a mixture of natural wood and painted, but I couldn't get past the big hardware.
So I filled the holes and decided that I would put glass knobs on the drawers for a more updated look. I haven't bought them yet...so hopefully it looks good!
I also knew that I wanted to paint something on the top, so I spent some time looking for inspiration. When I realized that my computer ran out of ink....had to pick something that I already had printed.
So this is what I chose:

You can find this at Graphics Fairy

I wish I had waited till I had ink so I could have made it to the
size of the desk top


I used the newspaper transfer technique and it was super easy. Just put tape the newspaper to the surface, tape the graphic to the newspaper, and trace! I then hand painted it with black and distressed it. Worked great! I waxed the desk, but used Wipe On Poly on the top and on the drawers.
So here is what I have for now....would love to hear what you think!!

BEFORE

AFTER
If your not already a follower, I would love for you to follow :-)

[Continue reading...]

Wednesday, November 23, 2011

An old stool + Graphics Fairy = SMILES

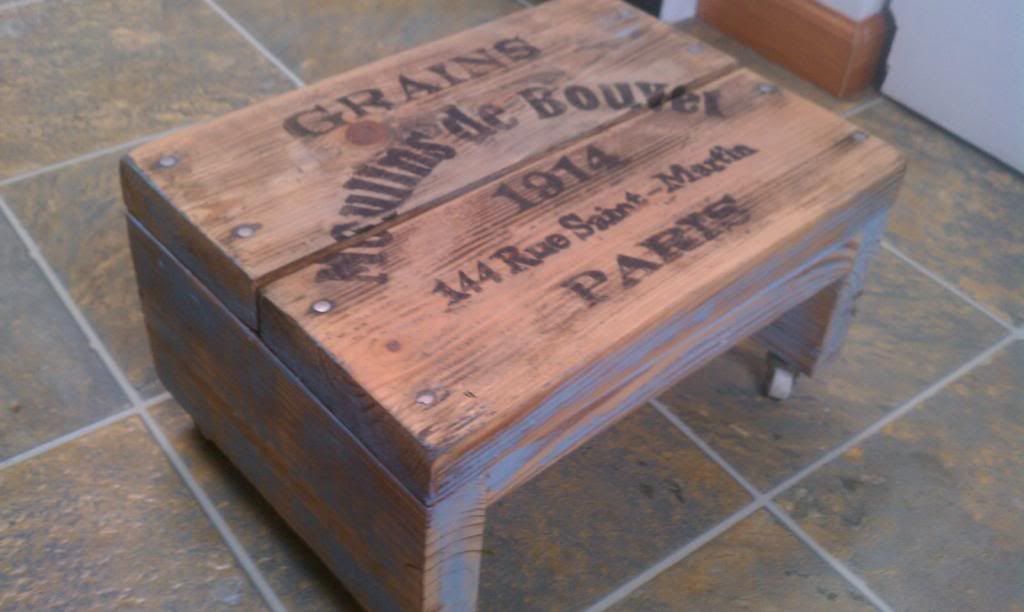
Last weekend when I was at my brothers house finishing the dining room set, a neighbor was having an estate sale. I must have driven past it 3 times before I couldn't resist. There wasn't much but I picked up an old TV cabinet ( I'll be getting around to that soon) and this old wood stool on caster wheel (of course I forgot to take a before pic, but it's not a hard one to imagine). I got them both for 5 bucks! Apparently I was the only one that found this little stool appealing (I showed up at the end of the day).
I headed over to the Graphic's Fairy blog and went through her amazing graphics till I came across this one


then I went to the website BlockPosters.com that she mentions on one of her posts. It is free and it will resize your graphic to any size easily. The technique that I used is from that tutorial as well. 
I decided not to use the wheat part of the picture since I had limited space, but I love how it turned out!


After I was finished painting on the graphic, I painted parts in blue and sanded and sanded some more to remove most of the blue. I wanted to make sure that it still looked old. 
I have a confession, which I am really only admitting to because my mistake can save you A LOT of time!! I didn't wait till the black paint was 100% dry and when I distressed it, the wood became a black mess, Duh!! It looked aweful! So I sanded it down and started over :-( A days work, wasted. So lesson, wait till paint is completely dry before distressing! The second time, I waited overnight. So after distressing again 
I used Minwax wipe on Poly to protect it. I LOVE, LOVE, LOVE how it turned out! I would love to hear what you think!


Linking up at:


[Continue reading...]

Total Pageviews